Endpoint Multi-factor Authentication (MFA) Configuration Guide
Supported OSs: Windows, macOS, and Linux OS.
Password reuse and stolen credentials are the major cause of cyberattacks including password spray and dictionary attacks. However, with Endpoint MFA enabled, the above kinds of cyberattacks can be thwarted as users will be required to enter their Active Directory (AD) domain credentials, and also use additional authentication factors like an SMS passcode configured in ADSelfService Plus.
Before you begin
GINA/Mac/Linux installation
Before users can reset passwords from their logon screen, admins have to deploy the logon agent on the users’ machines in one of the following ways:
A. Client software installation from the ADSelfService Plus admin console
-
Navigate to the Configuration tab > Administrative Tools > GINA/Mac/Linux.
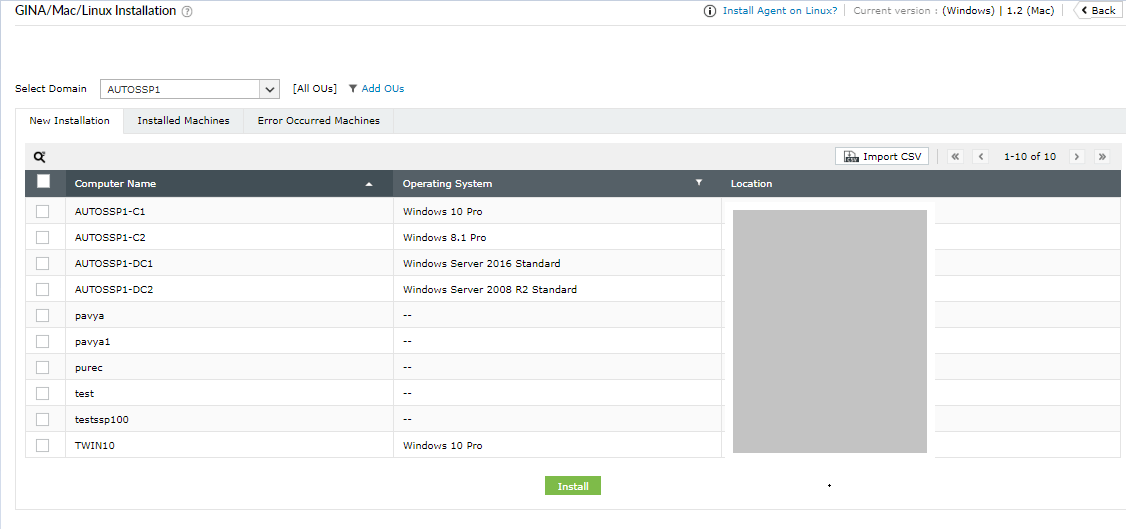
- Click GINA/Mac/Linux Installation.
- In the New Installation section, choose the required Domain from the drop-down.
- Click Add OUs to select the OUs for which the logon agent should be installed. Click Get Computers.
- Now, select the computers to which the logon agent needs to be pushed.
- Click Install.
B. Manual installation of the client software:
You can manually install ADSelfService Plus' client software on users' Windows, macOS, and Linux machines.
Manual installation for Windows clients
- Paste the MSI package (Location: C:\ManageEngine\ADSelfService Plus\bin) in the client machine.
- Begin the Client Software Setup Wizard and complete the required steps.
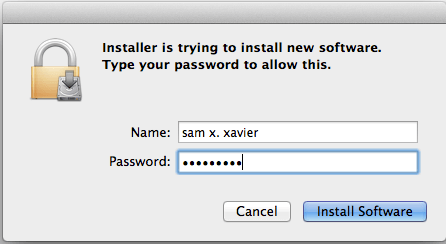
Manual installation for macOS clients
- Copy the ADSelfServicePlusMacLoginAgent.pkg (Location: install_dir>/bin/) file to the Mac client machine.
- Double-click the ADSelfServicePlusMacLoginAgent.pkg file to begin the installation process.
-
Once you click the Install button, you'll be asked to enter your username and password. Please use the account information you use to log on to your Mac.
-
Enter the ADSelfService Plus server name and port number when prompted.
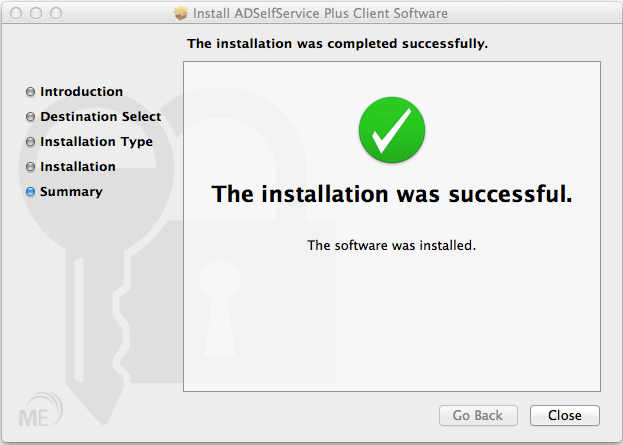
- The installation is complete. In the window that opens, click Close.
Manual installation for Linux clients
-
Copy the installLinuxAgent.sh, ADSSPLinuxClient.tar.gz from this folder: <Install Directory>\bin (Default location: C:\ManageEngine\ADSelfService Plus\bin).
Note:
You need to copy the TAR file based on the client OS architecture. There will be two TAR files:
- ADSSPLinuxClient.tar.gz for i686 clients (32-bit)
- ADSSPLinuxClient64.tar.gz for x86-64 clients (64-bit)
- Paste the copied files in the Home folder of the Linux machine.
Launch the Linux terminal and execute the following commands:
sed -i 's/\r$//' installLinuxAgent.sh
sudo bash installLinuxAgent.sh -install -serverName <adssp-server/IP> -portNumber
<adssp-server-port> -protocol <adssp-server-protocol>
Where:
- serverName = The name of the machine in which ADSelfService Plus is deployed.
- portNumber = The port number using which ADSelfService Plus is running.
- protocol = The protocol with which ADSelfService Plus is running (http or https).
Prerequisite:
SSL must be enabled: Log in to the ADSelfService Plus web-console with admin credentials. Navigate to Admin tab → Product Settings → Connection. Select the Enable SSL Port checkbox.
Steps involved
- Log in to the ADSelfService Plus web-console with admin credentials.
-
Navigate to Configuration → Self-Service → Multi-factor Authentication → Authenticator Settings tab → Endpoint MFA.
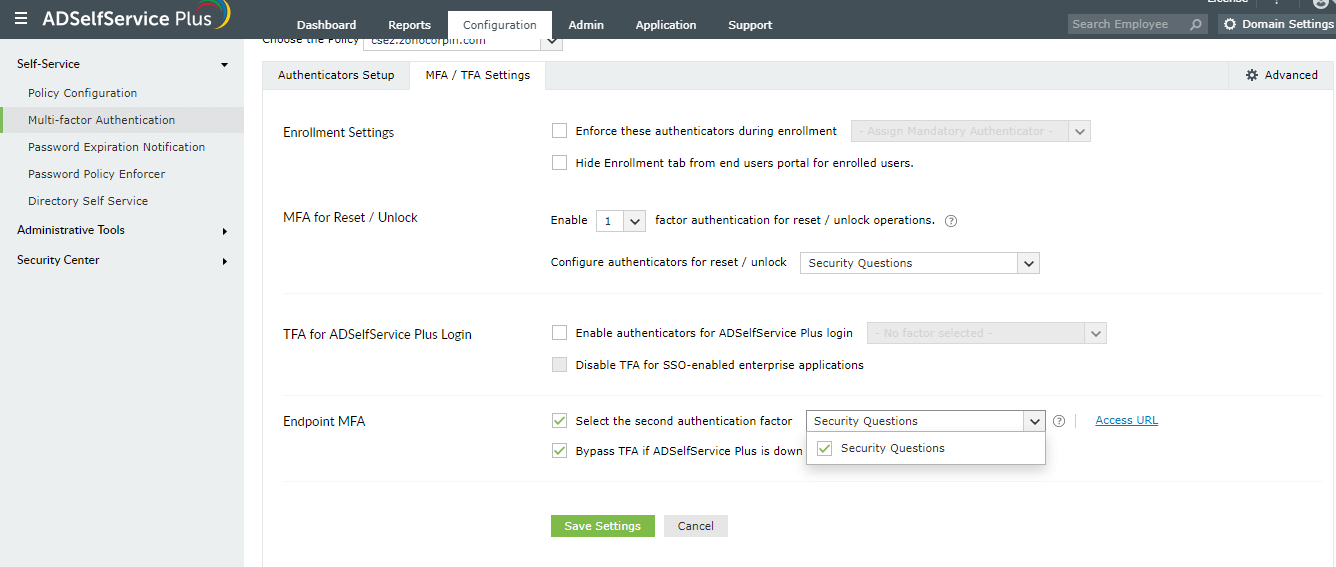
- In the Choose the Policy field, click the drop-down box and select the policies for which you wish to enable MFA.
- ADSelfService Plus allows you to create OU and group-based policies. To create a policy, go to Configuration → Self-Service → Policy Configuration → Add New Policy. Click Select OUs/Groups, and make the selection based on your requirements. You need to select at least one self-service feature. Finally, click Save Policy.
- Check the Select the second authentication factor option.
- By default, the Bypass TFA if ADSelfService Plus is down option is selected when you enable Endpoint MFA. If this option is not selected, users would not be able to access their machines when ADSelfService Plus is not accessible.
- Click Save.


 ADManager Plus
 ADAudit Plus
 Exchange Reporter Plus
 M365 Manager Plus