Support
The ADSelfService Plus Support tab is a hub for the resources that help you run and get help with the product. From here you can reach the technical support team, upload log files for analysis, browse the user forums and knowledge base, visit the online store, and compare editions. The page also shows the running Version and Build, along with feeds of recent forum posts and announcements. Open it from the Support tab in the top menu.

Contacting technical support
Under Classic Support, you can reach the support team in three ways:
- Phone: Call the toll-free number +1-844-245-1104 or the direct number +1-408-916-9890.
- Live chat: Click Here to Live Chat.
- Email: Write to support@adselfserviceplus.com.
| Note: Classic Support is available 24/5 and the team responds during working hours. For prioritized, 24/7 help, purchase the Premium Support package by contacting sales@adselfserviceplus.com. |
|---|
Submitting queries and uploading logs
Under Technical Support, click Mail Queries to email a question to the support team. While troubleshooting, the team may ask for your log files. Use the Create log links, Auto or Manual, to send them.
| Note: Log files are uploaded to Bonitas, a ManageEngine customer file-upload service, and are kept confidential and used only for debugging. |
|---|
Uploading logs automatically
Click Auto to upload log files from within ADSelfService Plus.
- Enter Your Mail ID and a Description of the issue.
- If you have raised a support ticket, enter its Ticket ID.
- From the Select Logs drop-down, choose the log files to upload.
- Use the Choose Period calendar to narrow the time frame of the logs.
- Click Send to compress and upload the files.
| Note: Only the default administrator can upload log files from the Auto screen. |
|---|
Uploading logs manually
If the Auto upload fails, upload the logs in one of two ways.
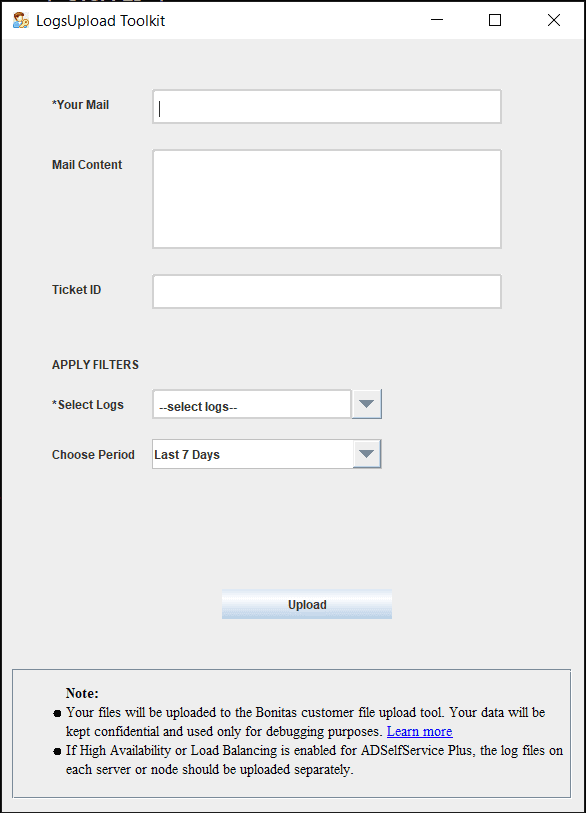
Method 1: The Logs Upload Toolkit
- Go to the ADSelfService Plus installation folder (by default C:\Program Files\ManageEngine\ADSelfService Plus).
- Run LogsUploadToolkit.bat as an administrator.
- In the wizard, enter Your Mail and a Mail Content description, and the Ticket ID if you have one. Choose the files with Select Logs, narrow the time frame with Choose Period, and click Upload.
| Note: The https://bonitas.zohocorp.com URL must be allow-listed for outbound network access on the ADSelfService Plus server machine. |
|---|
Method 2: The Bonitas portal
- In the installation folder, compress the files the support team requested from the \logs folder.
- Open the Bonitas portal.
- From the Product drop-down, choose ADSelfService Plus.
- Enter the Ticket ID if you have one, and set a Password to protect the logs if needed.
- Enter Your email address and, beside Comments, describe the issue.
- Click Add Files to attach the logs, choose the purpose (for example Log Analysis, Debugging, or Migration), and click Upload.
Other resources
The tab also links to the following:
| Section | What it offers |
|---|---|
| User Forums | The ManageEngine Pitstop forum, where you can discuss ADSelfService Plus with other users and get product updates. The page also lists Recent Forum Posts. |
| Knowledge Base | Solutions to common issues and steps for frequent tasks, plus Documents such as brochures and data sheets. |
| Online Store | Get Quote for personalized pricing, Pricing for component pricing, and a link to buy an ADSelfService Plus license. |
| Need Features? | A Request for a new feature link to send your requirements to the team. |
| Compare Editions | A comparison of the Standard and Professional editions, the add-ons, and Endpoint MFA, opened from Standard (Vs) Professional. |
Tips
- Include a clear Description and your Ticket ID when uploading logs so the team can match them to your case quickly.
- Use Choose Period to upload only the relevant days of logs, which keeps the upload small and focused.
- If Auto upload fails because outbound access is blocked, use the manual Logs Upload Toolkit or the Bonitas portal instead.
- Check Compare Editions before purchasing to confirm which features and add-ons your edition includes.