Mail Settings
Overview
The Mail Settings tab configures the mail server that ManageEngine ADSelfService Plus uses to send multi-factor authentication (MFA) codes, reports, and notifications by email. It is the first tab on the Mail / SMS Server Settings page, under Admin > Product Settings > Mail / SMS Settings, and applies to both Active Directory and Microsoft Entra ID modes. ADSelfService Plus supports two delivery modes: SMTP, which connects to your mail server over the SMTP protocol, and API, which sends mail directly through your provider's API. The mail server must be configured here before any email notification, report, or one-time passcode can be delivered.
Prerequisites
Confirm the following before you configure the mail server:
- You are signed in to the ADSelfService Plus admin portal with administrator privileges.
- You have your mail server details ready: the host name or IP address, the port number, and the authentication credentials (a username and password for Basic Authentication, or the OAuth credentials for OAuth Authentication).
- For OAuth Authentication or the API mode, ADSelfService Plus runs on the HTTPS protocol with a valid SSL certificate, because Microsoft Azure and Google Identity require non-localhost redirect URIs to use HTTPS.
How it works
In SMTP mode, ADSelfService Plus connects to your mail server and sends email over the SMTP protocol using one of two authentication methods. Basic Authentication uses a username and password. OAuth Authentication uses token-based authentication through Microsoft or Google, so no password is stored: ADSelfService Plus obtains an OAuth access token from Azure AD or the Google Identity Platform and uses it to authenticate. In API mode, ADSelfService Plus sends mail directly through the provider's API instead of SMTP, using the Microsoft Graph API (with a tenant ID, client ID, and client secret) or the Gmail API (with a Google service account that has domain-wide delegation and a JSON private key).
Configuration instructions
Opening the Mail Settings tab
- Log in to the ADSelfService Plus admin portal with administrator privileges.
- Navigate to Admin > Product Settings > Mail / SMS Settings.
- Click the Mail Settings tab. The Configure Mail Server section appears.
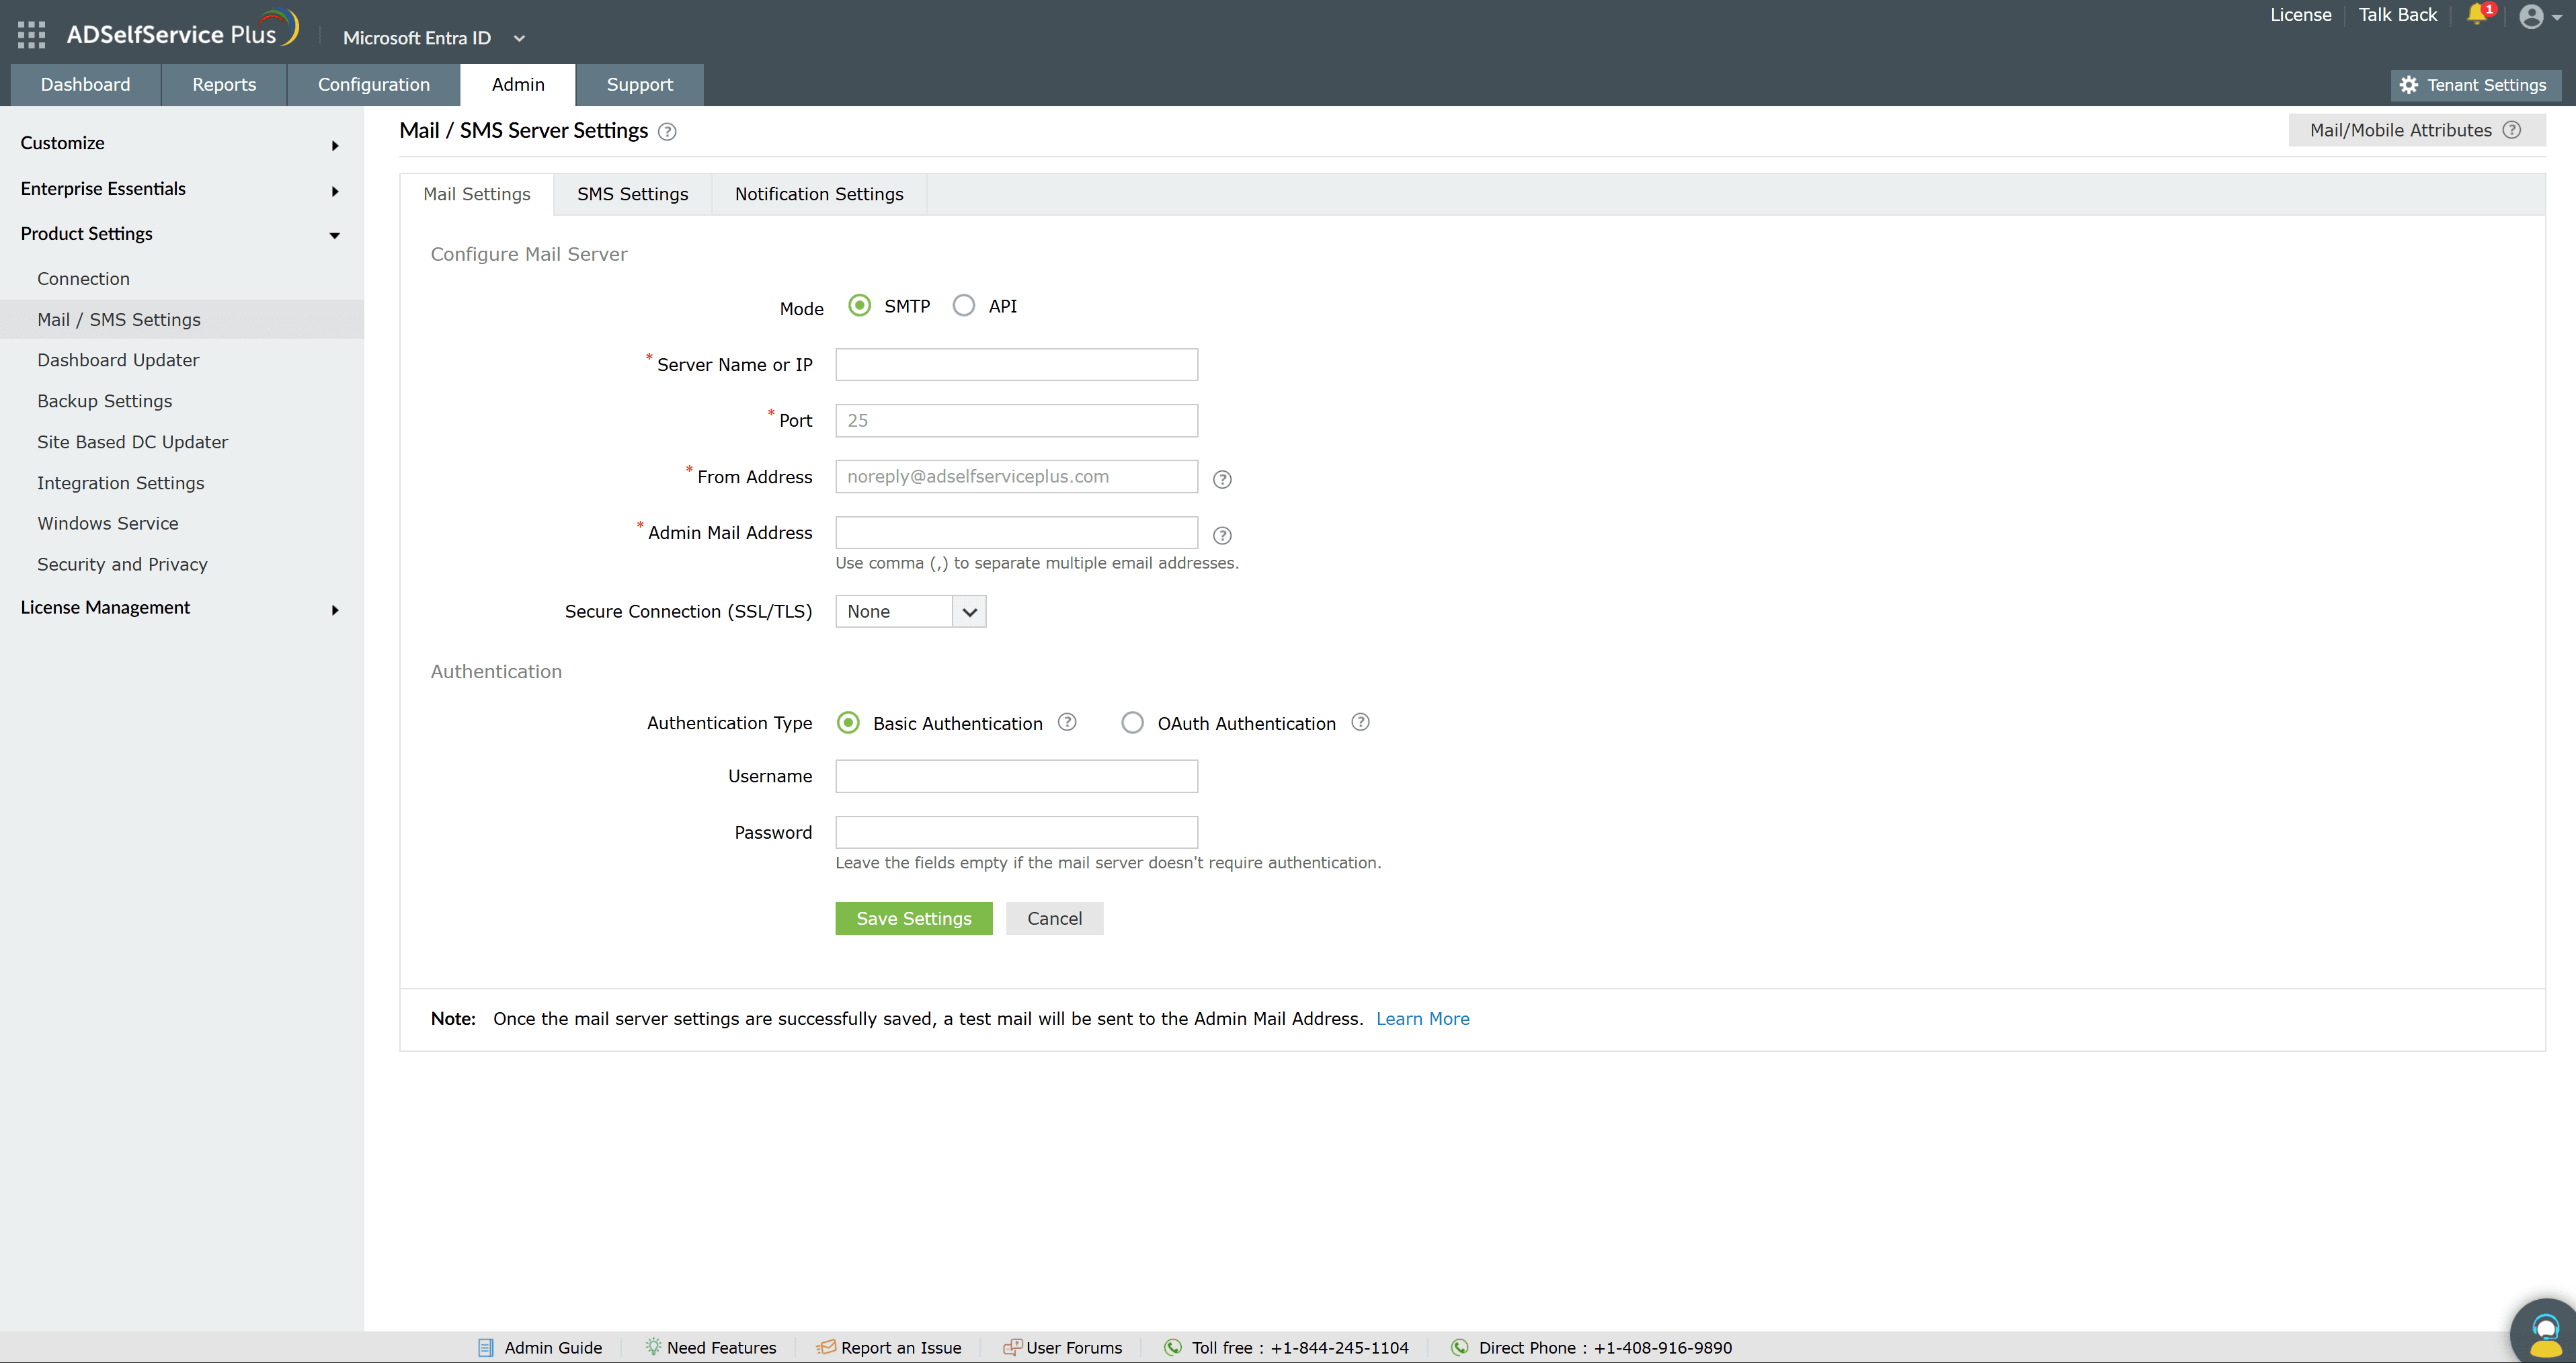
Configuring an SMTP mail server
- Next to Mode, select SMTP.
- In Server Name or IP, enter the host name or IP address of your mail server.
- In Port, enter the port the mail server listens on. The default is 25.
- In From Address, enter the email address that ADSelfService Plus will send notifications, reports, and alerts from (for example noreply@adselfserviceplus.com).
- In Admin Mail Address, enter the email address that should receive notifications about the mail ADSelfService Plus sends.
- From the Secure Connection (SSL/TLS) drop-down, choose the option your mail server supports: None, SSL, or TLS.
- Next to Authentication Type, choose Basic Authentication or OAuth Authentication, then complete the matching fields described below.
- Click Save Settings.
| Note: In the Admin Mail Address field you can enter more than one address. The on-screen hint reads Use comma (,) to separate multiple email addresses. |
|---|
| Note: Once the mail server settings are saved successfully, ADSelfService Plus sends a test email to the address in the Admin Mail Address field. Use this to confirm the configuration works. |
|---|
Basic Authentication
When Authentication Type is set to Basic Authentication:
- In Username and Password, enter the credentials used to access the mail server.
- If your mail server does not require authentication, leave both fields empty. The on-screen hint reads Leave the fields empty if the mail server doesn't require authentication.
OAuth Authentication
When Authentication Type is set to OAuth Authentication, select your Mail Provider, then provide the credentials for it:
- Microsoft: enter the Username, Tenant ID, Client ID, and Client Secret. ADSelfService Plus treats Azure Cloud (default) as the Azure environment; to change it, use the Azure Environment drop-down, which also offers Azure China and Azure US Government.
- Google: enter the Username, Client ID, and Client Secret.
| Important: OAuth Authentication requires ADSelfService Plus to run on HTTPS with a valid SSL certificate, because Microsoft and Google reject non-localhost redirect URIs that are not HTTPS. To obtain the Microsoft credentials, register an application in the Azure portal under App registrations and create a client secret under Certificates & secrets. To obtain the Google credentials, create OAuth client credentials in the Google API console with the Gmail API enabled. |
|---|
Configuring a mail server through an API
Use this method to send mail directly through your provider's API instead of SMTP.
- Next to Mode, select API.
- From Mail Provider, select Microsoft or Google.
- In From Address, enter the email address that ADSelfService Plus will send mail from.
- In Admin Mail Address, enter the email address that should receive notifications about the mail ADSelfService Plus sends.
- If the provider is Microsoft, enter the Tenant ID, Client ID, and Client Secret. ADSelfService Plus treats Azure Cloud (default) as the Azure environment; to change it, use the Azure Environment drop-down (Azure China or Azure US Government).
- If the provider is Google, upload the JSON private key file generated for your Google service account.
- Click Save Settings.
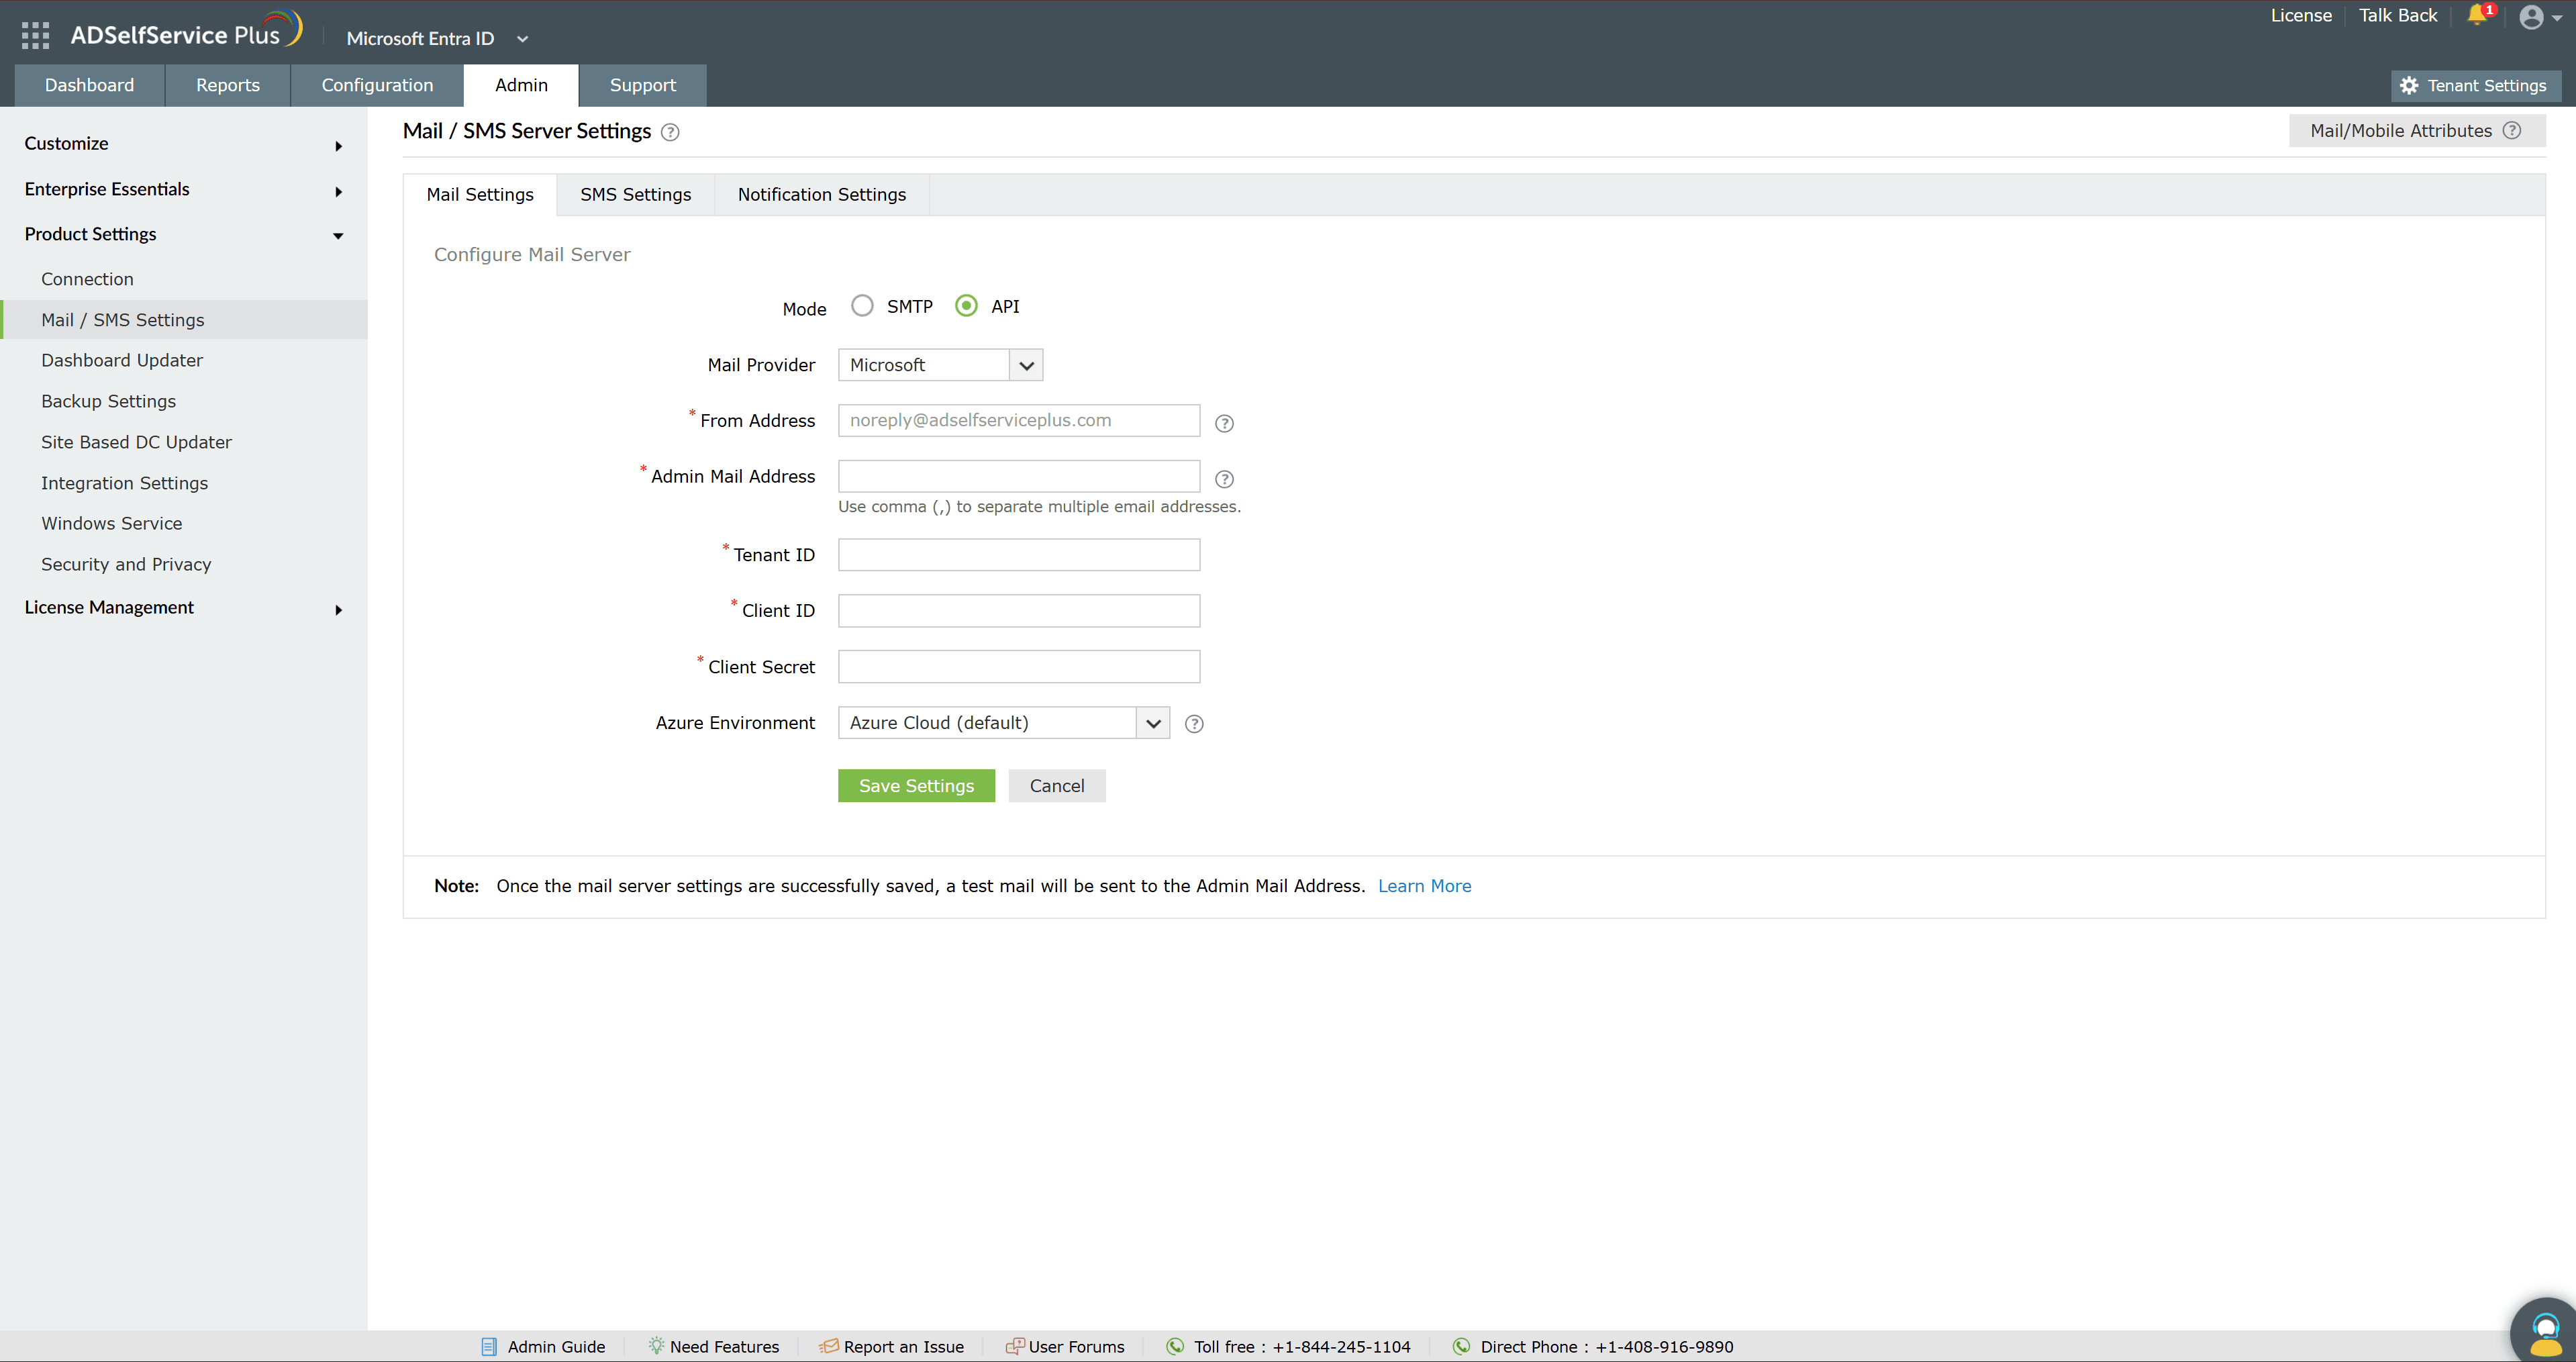
| Important: For the Microsoft API, grant the application the Microsoft Graph Mail application permission and admin consent before saving. For the Google API, the JSON private key can be downloaded only once, when it is created. |
|---|
Limitations
- For a Google API configuration, the JSON private key can be downloaded only once, at creation. If it is lost, you must generate a new key; the original cannot be retrieved.
- For Microsoft OAuth and API configurations, the client secret has an expiration date. When it expires, generate a new client secret and update it in ADSelfService Plus, or email delivery stops.
Tips
- Configure the mail server before you set up email notifications, expiry reminders, or OTP-based identity verification. Those features depend on it, and will prompt you to configure a mail server if it is missing.
- Use the test email that is sent to the Admin Mail Address on save to confirm the server, port, and credentials are correct.
- Prefer OAuth Authentication or API mode over Basic Authentication where your provider supports it, since no password is stored. Both require ADSelfService Plus to run on HTTPS.
- Track the expiry date of any Microsoft client secret and renew it ahead of time to avoid an interruption in email delivery.
- Configure your SMS gateway on the SMS Settings tab and choose which events trigger alerts on the Notification Settings tab of the same page.