GINA/macOS/Linux Unlock Account Audit Report
This report provides details of users' utilization of the login agent on their Windows, macOS, or Linux machines to unlock their accounts from the login screen. It enables administrators to monitor endpoint account unlock activities, track login agent functionality, and ensure users can efficiently regain access to their workstations without help desk intervention.
How it works
ADSelfService Plus tracks unlock attempts made directly from Windows, macOS and Linux user workstations at the login screen, capturing detailed endpoint information including machine names, IP addresses, and attempt status for complete audit trail. The report contains information such as the username, time the unlock was attempted, IP address of the device, total number of attempts, and status (i.e., if the account was unlocked or not).
Limitation
Account unlocks performed through the web portal, mobile app, or other methods will not appear in this report. To view account unlock data from other ADSelfService Plus endpoints, you must use the Unlock Account Audit Report.
Prerequisite
You must have administrator or technician-level access to the ADSelfService Plus portal to generate and view reports.
Generating the GINA/macOS/Linux Unlock Account Audit Report
To generate the GINA/macOS/Linux Unlock Account Audit Report:
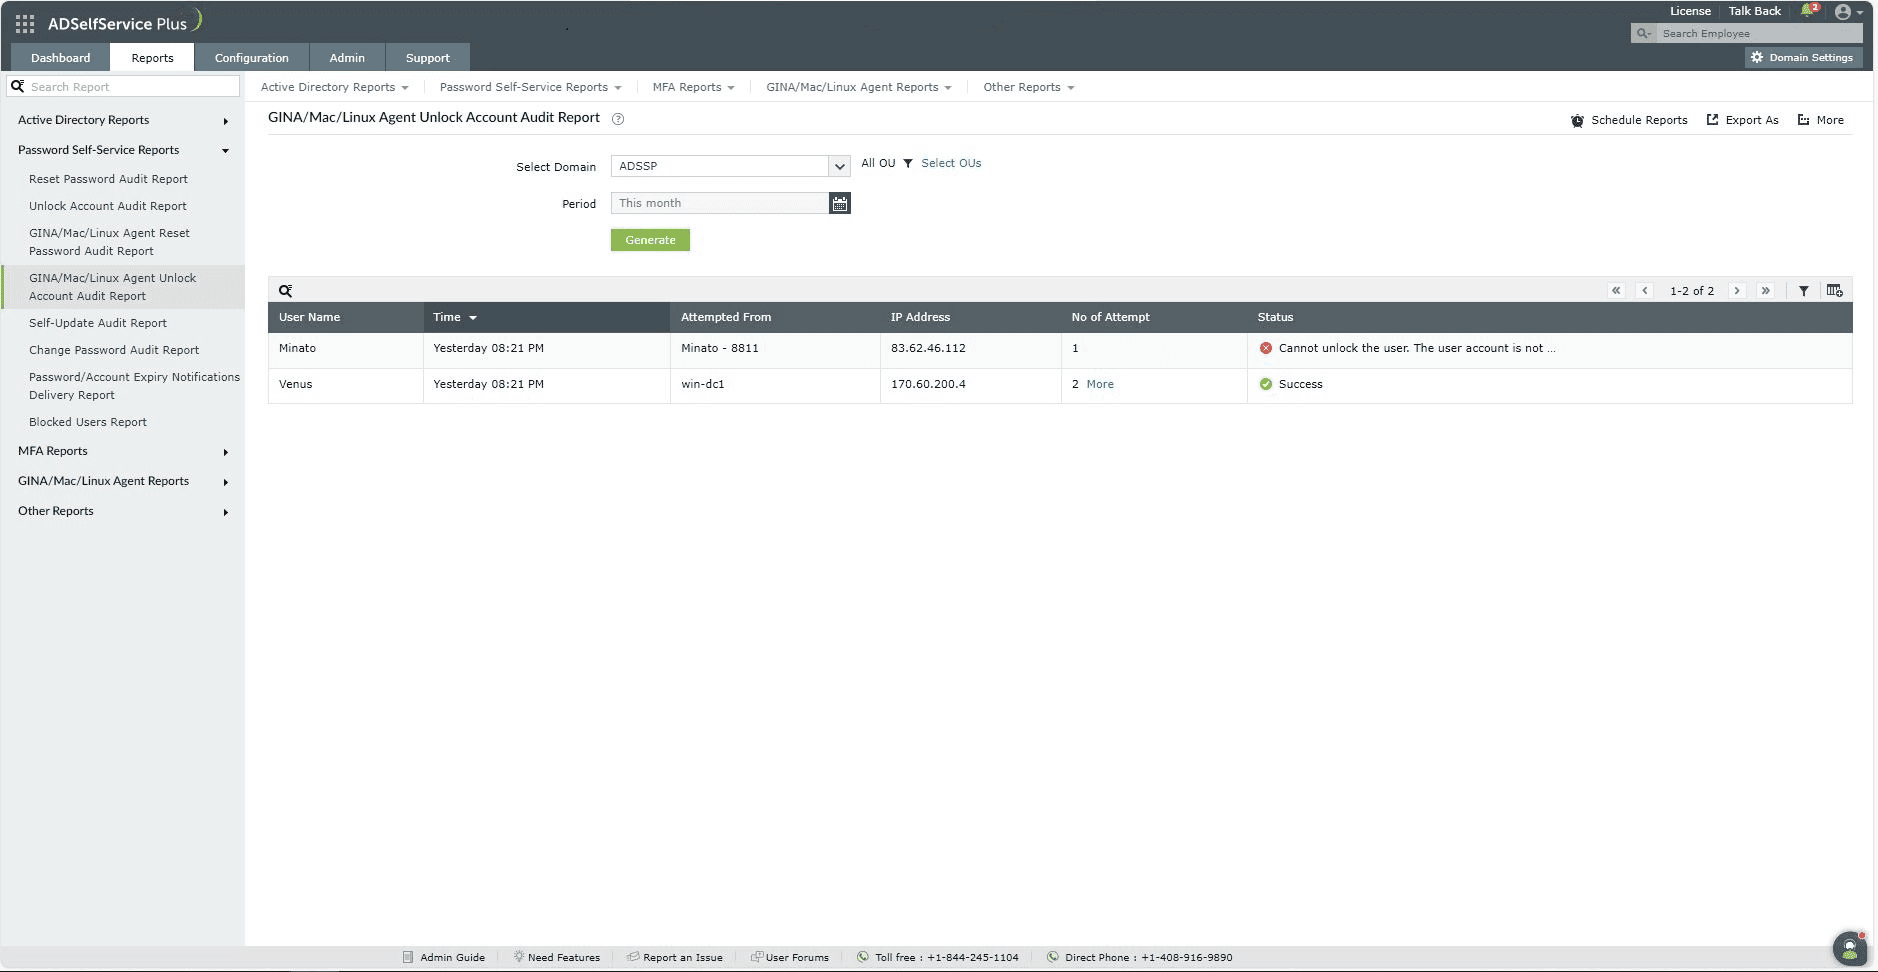
- Log in to the ADSelfService Plus admin portal with Administrator or Operator privileges.
- Navigate to Reports > Password Self-Service Reports > GINA/macOS/Linux Unlock Account Audit Report.
- Specify the domain you'd like to search within using the Select Domain option.
- Use the Select OUs option to specify the OUs to search within, if needed.
- The Period drop-down menu can be used to specify the time period for which to generate the reports. Options include Today, Yesterday, Last 7 days, Last 30 days, This month, and Custom Period.
- Click Generate.
Customizing the GINA/macOS/Linux Unlock Account Audit Report
- Adding or removing columns: To add or remove columns, click on the Add/Remove Columns [
 ] option at the far right of the report. In the Select the columns to be displayed pop-up that appears, select the required fields under Available Columns and click on the right arrow ( >> ) to move it to the Selected Columns. To remove columns, select the unused fields under Selected Columns and click on the left arrow ( << ) to move it to Available Columns.
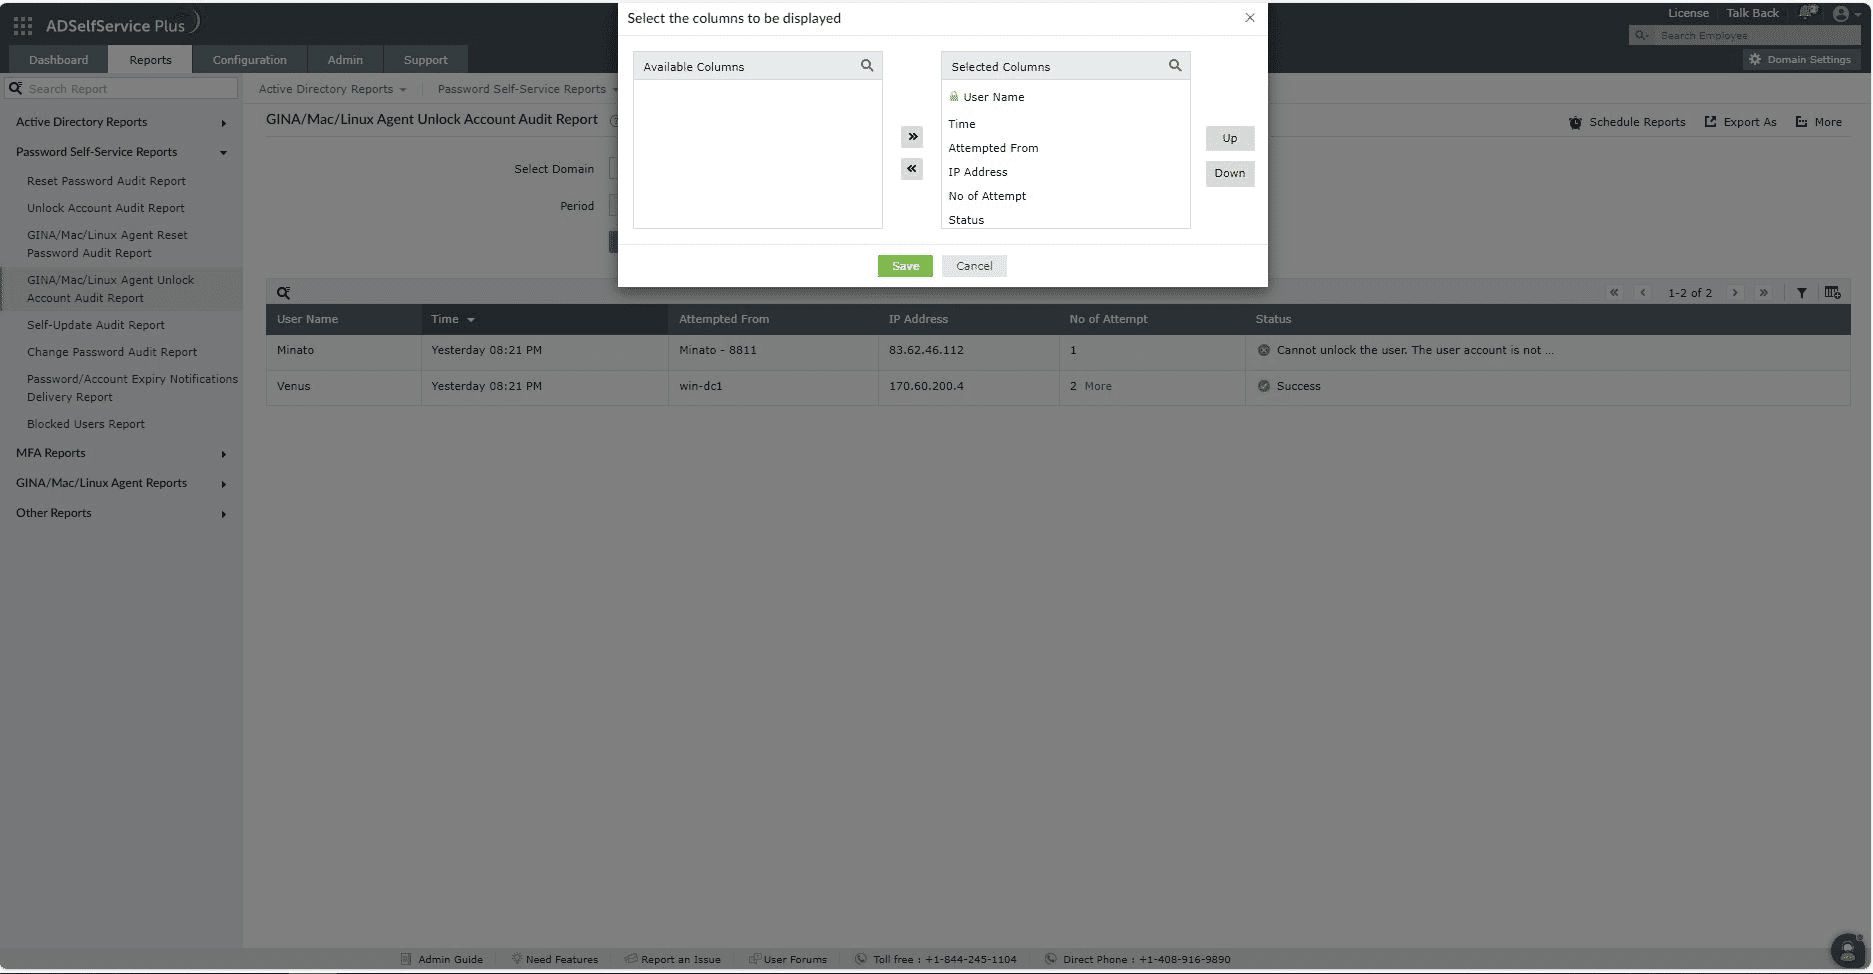
- Ordering the columns: The columns' positions can also be altered by selecting a value under Selected Columns and using the Up and Down options to change its position.
Advanced Filtering
Once the report is generated, the entries can be narrowed down based on the following parameters by clicking the Advanced Filter [  ] icon at the far-right side of the report page.
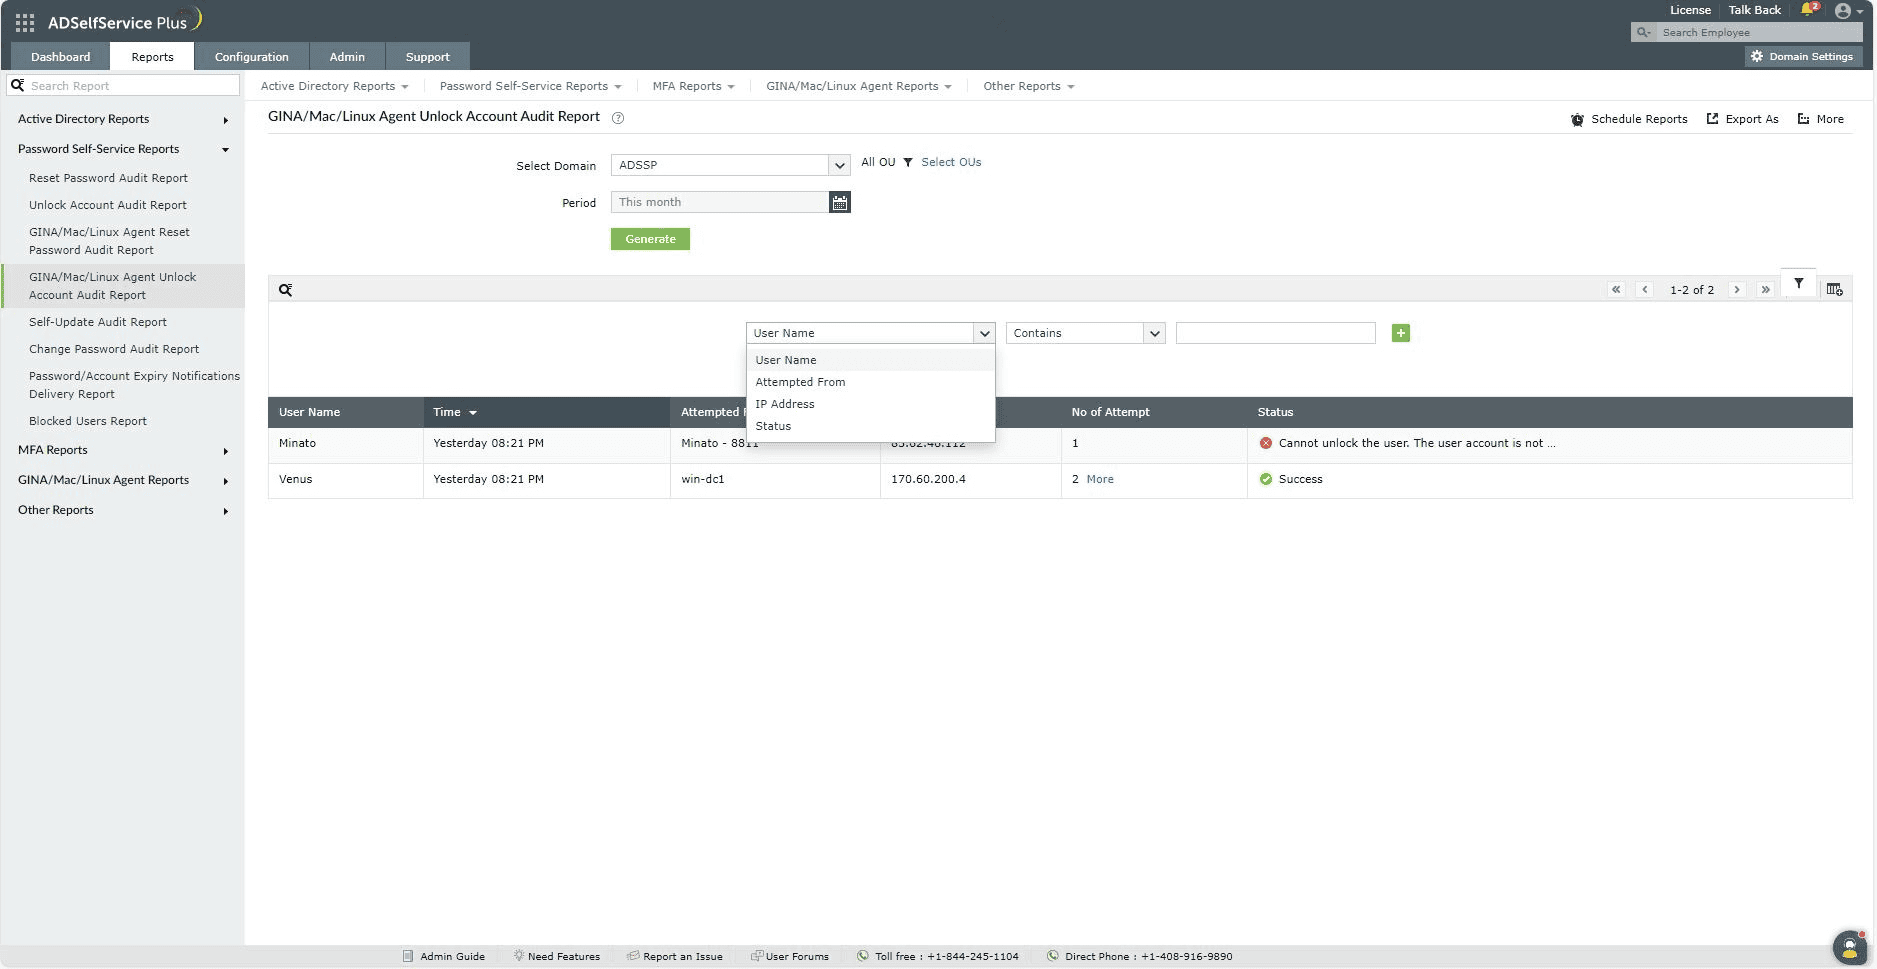
- User Name: This option lets you narrow-down the account unlock attempts by username. The conditions available to refine this include Contains, Does Not Contain, Equals, Is Not Equal To, Starts With, and Ends With.
- Attempted from: This option lets you display results by the name of the machine the account unlock was attempted from. The conditions available to refine this include Contains, Does Not Contain, Equals, Is Not Equal To, Starts With, and Ends With.
- IP Address: This option lets you display results by IP address. The conditions available to refine this include Contains, Does Not Contain, Equals, Is Not Equal To, Starts With, and Ends With.
- Type of account unlock:
- Self-served: Choosing this option will display the account unlocks done by users using ADSelfService Plus's Unlock Account feature.
- Automatic: Choosing this option will display the automatic account unlocks that occurred due to administrators enabling the Automatically unlocks locked-down accounts in your domain option (Configuration > Policy Configuration > Advanced > Automation), which runs a scheduler that unlocks accounts regularly.
- Status of the unlock attempt: Whether the account unlock was a Success or Failure.
Sorting
Click on any of the column headers to view the report's entries in ascending or descending order.
Searching
- Click on the search icon [
 ] in order to search for specific data in the report.
- Specific users can be searched for using attributes such as their sAMAccountName, or Display Name.
- Searching happens using the criteria ' contains '. For example, if the username column is searched for the word " jack " , then all usernames containing the sequence " jack " will be displayed as a result.
Automating the GINA/macOS/Linux Unlock Accout Audit Report generation
The Schedule Reports [ ] option at the top-right of the page can be used to schedule the generation of the report at specified intervals, and automatically email them to administrators or specific email addresses. Learn to schedule reports here.
Exporting the GINA/macOS/Linux Reset Password Audit Report
The Export As [ ] option at the right corner of the page helps export the report in CSV, PDF, XLS, XLSX, HTML and CSVDE formats.
Tips
The More [ ] option at the right corner of the page lists the Printable View, Send Mail, and Export Settings options.
- The Printable View option can be used to preview and print the report.
- The Send Mail option can be used to mail the report to the desired email addresses.
- Additionally, you can configure custom Export Settings, such as a personalized title for the report and a header logo that you may wish to display on each page.